Friday, March 10, 2017

Water Cycle Activity


In the N.E.W. core's science class, we learned about the water cycle. To display this cycle, our teacher made a small model to create a small water cycle.


Image result for water cycle


1) Evaporation
Water that is at the surface level becomes a gas, water vapor, after being heated up by the sun. This is called evaporation. This was simulated by heating up a beaker of salt water to represent the ocean and the heat of the sun then filling a glass bottle with the water, with a smaller bottle to catch the 'rain'.
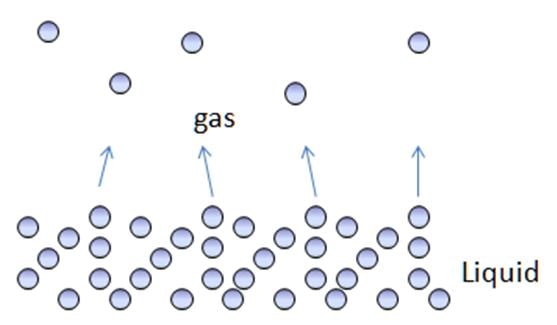
Image result for evaporation
2) Condensation
Once the water molecules reach the higher levels of the atmosphere, they start to get colder. This was simulated by covering the bottle with plastic wrap (the atmosphere) and putting ice on top (the cold). The atmosphere keeps the heat in, trapping it and the water. As the water molecules begin to slow and cool down, they attach to dust particles and may become ice crystals which form clouds. This is condensation. Condensation can be seen on the sides of the bottle, where the gas starts to become liquid at the sides of the bottle.

Image result for condensation

3) Precipitation
When the water molecules are heated up more, they begin to melt. The heat makes them go from their solid ice form back to their liquid form, falling back to the ground. This is precipitation. This can be in the form of rain or snow. After water condensated on the plastic wrap, it fell back into the other bottle inside of the bottle. This helped us better see how much it precipatated in the simulated water cycle. Once water reaches the surface, it will either go into the ground, lake or ocean or become part of a run-off. Most rivers and creeks are run-offs, meaning that the ground has already soaked up as much water as it can.

Image result for rain

Other notes:
*Sublimation: Going from solid ice to liquid gas. Usually happens in cold, dry places.
*Plants will take in water from the surface where their roots can reach it, then use it to transport nutrients up to their leaves and for photosynthesis.


Monday, March 6, 2017

Ecology Intro Activity


For N.E.W.'s science class, we will be learning the subject of ecology. Ecology is the study of ecosystems, or how living and non-living things interact in their environment. To introduce the topic, we had an activity where we had to get in groups of 11-12 people. One of the people was the leader, while all the rest had labels that had biotic and abiotic factors. A factor that is biotic is something living while a factor that is abiotic is not. Both biotic and abiotic things have to interact in an environment to create an ecosystem.

The leader had to connect all of the biotic and abiotic factors together with yarn, red yarn representing consumers (organisms that eat other organisms) and green representing producers (organisms that produce their own energy). If two organisms were connected, the one with red yarn eats the one holding onto the green end. This led to us making a food web, with water in the middle since all organisms need water. All of the organisms were connected in a variety of ways since some that ate others were eaten by something else.


Once everything was connected, we added vocabulary words from our word bank to our labels. For example, a monkey is not only a monkey but prey, a predator, consumer and a biotic factor. This activity helped us understand what ecology is by teaching us the vocabulary and basic connections between animals, plants, fungi and abiotic things in their environment. 

Wednesday, February 15, 2017

Questions to Ask when Self-Evaluating


These are a set of questions (from this document about the importance of self-evaluation in benefiting students' learning) to ask while self-evaluating. 
  • Are you satisfied with your learning? 
  • Are you satisfied that you demonstrated your knowledge and skill? 
  • How does your work compare to the expectations on the rubric? 
  • With which parts of the assignment (project, performance, etc.) were you most satisfied? 
  • How closely does your work on this assignment (project, performance, etc.) reflect your learning? 
  • Why do you think this assignment worked for you? 
  • Were there any parts that didn’t work? 
  • How did you do the assignment/project? Be specific. 
  • Were the strategies that you used effective in helping you reach your goals?  
  • What learning strategies were helpful? Explain.  
  • What would you have to add to learn more, do better, etc.? 
  •  On a scale of 1 to 10, how would you rate your effort? 
  • Did the amount of time, effort and strategies used help you reach your goal? 
  •  If you were to do this over, how could it be improved? 

Wednesday, February 1, 2017

STEM Design Challenge

In our science class, we were given a block to design and create a water slide for a small toy. All of our groups had to use teamwork, their understandings of physics and design and be able to work under pressure. This was the design our team came up with.


If we were to do this again, we wouldn't use the easel and instead use one of the larger pieces of wood to hold up our slide. We would also make it longer or taller, since the main point of the challenge was to make the longest/tallest slide. We would also cut the top of the cups, since the toy got stuck in slide. All of the teams had a fun time doing this, and learned from the experience, even if their designs didn't work.

Tuesday, January 31, 2017

Unit 2: Mental Health Reflection


Image result for mental disorders in teens
http://www.visionsteen.com/2014/06/find-the-top-mental-health-facility-for-teens-in-southern-california/

"Approximately 20% of adolescents have a diagnosable mental health disorder" (Schwarz, NCCP) and these symptoms usually appear during adolescence. Depression, anxiety, schizophrenia, bipolar disorder, attention-deficit/hyperactivity disorder, eating disorders and other mental illnesses are commonly found in adolescents. If these illnesses are left untreated, they can have lasting effects or even harm the person who has them. That's why N.E.W. School took 8 weeks to learn about mental illnesses and their physical effects, being able to recognize the symptoms, even in fictional characters and raising awareness for these illnesses through creative mediums. 


One of the earlier and smaller projects we did in N.E.W. school was labeling a cauliflower as if it were a brain, looking at the physiology of the brain. We used a website for reference so that we could cut up the brain to symbolize the right and left sides of the brain, then label the parts inside to represent sections of the brain. An example would be the brain stem is the cauliflower stem because it is they resemble each other. Then on a separate document, we made a key with a paragraph of what each of the parts does and how it affects neurotransmitters, hormones, and overall mental health. 


After we finished labeling the cauliflower, we moved onto part 2. Part 2 was when the teacher physically altered the brain, with our group we had a tumor in the back of the brain. We researched it and found it to be medulloblastoma, a tumor found in the cerebellum. It is usually found in young children.
Image result for cerebellum medulloblastoma
http://www.scielo.br/scielo.php?script=sci_arttext&pid=S0004-282X2003000200008
When we finished researching the symptoms of medulloblastoma, we had to write a narrative from the perspective of the patient, the parent or the doctor dealing with this disease. I decided to write it from the point of view of the patient, taking account nausea and trauma they would be dealing with. The story can be found on this blog or with this link. 

A larger project our class worked on was the Romeo and Juliet Psychoanalysis. To lead up to the essay we acted out the play in class. This helped us better understand the emotions and interactions between characters before analyzing their behavior to write our essay. 


Romeo and Juliet acting
After finishing the play, we each got to pick a character and pick what mental disorder they most likely have by using the book and online resources as evidence. I picked Mercutio and diagnosed him with intermittent explosive disorder (IDE) because of his sudden outbursts. This essay helped me better understand how to find scientific resources to back up analyzed claims and recognize the symptoms and signs of mental disorders. 


Storyboards for the Mental Health Awareness Project
The last project I will talk about is the culminating mental health unit project where we had to pick a creative medium to raise awareness for a mental health disorder of our choice. I chose depression and rose awareness for it by creating an animatic (unfinished animation) of a day in a person with undiagnosed depression. 


 This project helped me better understand how it feels to have a mental disorder, how to recognize it in other people and be able to raise awareness for mental health disorders in general. I called my animatic Silent Sickness, because depression is not something easily seen by the eye. This project also helped me learn how to use the tools at my disposal to make something greater, since I had to use an animation program, online resources, a voice recording program, and an editing software. Overall, this project culminates science, english and technology because it used narrative techniques, scientific thought and technology knowledge. 
Showing the animatic at the Exposition

To restate all the above points, each of these projects helped me better understand the concept of mental health and learn how to recognize and raise awareness for mental health disorders. I used Science to better learn about the physical and neurological implications, Technology to research and educate about these disorders, and English to be able to communicate my points effectively, whether through narrative or analytical techniques. This unit helped me understand the emotional and mental points of view of people with mental health disorders, who are all around us. 


Forensics and DNA Testing


Forensics and DNA testing
(Also seen under Science Page)


There was a murder, but no one knows who it was. The suspects are Capulet, Lady Capulet, Paris, Benvolio, Friar Lawrence and others at the scene of the murder. It was the murder of Romeo and Juliet.
To learn which one of the suspects did it, the students at N.E.W. school will have to learn how to use gel electrolysis to separate the macro molecules in DNA so that the matching DNA can be found.
The first step in this process was creating the chamber to hold the DNA in. For this project, the chamber was a plastic box. Two wires were measured out, and in the next step, they will each be electrically charged, one positive and one negative. Since DNA macro molecules are negatively charged, they will be attracted to the positive charge.
Then the students had to cut out rivets in a piece of cardboard for each DNA sample to go in. After that, the chamber is filled with agarose for the DNA to go in. Each sample would be compared to the one of the murderer and depending on the mass, they will go farther down the agarose. The one that is right at the same spot as the murderer probably belongs to the murderer.


To extract the DNA, first, the suspects had to chew the side of the mouth. Then they had to grab a cup from a cell, remembering where they got it from. Then they had to swish the salt water in their mouth for 30 seconds then spit it back in their cup. Each of the suspects got a number. Then they repeated the process so there could be two samples.


The suspects were chewing at the epithelial tissue, taking off cells and spitting them out. Inside the cells are nuclei, the brains of the cell. Inside the round organelle is a DNA strand of molecules in the shape of a double-helix. To get to the DNA, the cell membrane and nucleus need to be broken with a chemical breakdown. The students at NEW have to do this, dying it so it can be seen under a microscope. The enzyme protease (ends in -ase, like most all enzymes) is what is usually used to break open the nucleus and membrane. Since protease isn't easily available, the students will be using laundry detergent mixed with water.


The groups each had to make a set amount of mild detergent, a 5 mL to 15 mL ratio. Then they extracted DNA from the cups, and the more people they wanted to test, the more detergent and DNA they would need. To extract the DNA, they used a pipette, and took out 5 mL to put into a test tube, then added 5 mL of detergent. After a few minutes of swishing the solution, 5 mL of ethanol are added to the top.

Restrictive enzymes cut the DNA into smaller slices, and in different parts depending on the DNA. Some will be shorter and others are longer so they will traverse the gel faster or slower. Our class will have to use whole DNA.


Next, they had to take out the DNA from each test tube and move it to a micro tube. They could start to see clumps forming in the clear ethanol. Then they added .25 mL of blue methylene and one drop of glycerin.


Then a buffer solution was made with water and 1% baking soda. This went over the gel electrolysis chamber.


The comb was taken out and the electric wires were added in. Now the gel chamber and DNA are ready. The methylene is used to die the DNA and the glycerin weighs it down.

To finish off the DNA Lab, we had to put the DNA into the gel electrolysis chambers. To do this we first had to take out the comb from the gel, however, there was a problem with the gel. It stuck to the comb, so the whole block of gel was taken out of the plastic box. The groups then had to improvise and cut slits with a knife, then inject 200 microliters of DNA with a micro pipet into the slit. After that, the students then put alligator clips on the stainless steel wires, the negative side on the side of the DNA and the positive clip on the opposite side. Then they were connected to the electric box. Everyone moved away from the boxes to make sure not to get electrocuted.

There was a significant problem. During lunch, the power went out so the results won't be what they want them to be, but we still learned a lot from this experience.


Friday, January 27, 2017

Building a Deltahedron


During core, we were given a puzzle. To make a shape with 4 equilateral triangles with 6 popsicle sticks, no more, no less. Many students thought of overlapping the shapes so that it made a star with enough triangles, but they weren't equilateral or there were too many. Instead, our group made a Deltahedron, which is a pyramid with a triangle base. First, we glued the base together, then added the three other vertices so they all met up in the middle. The ending result was this:

Displaying IMG_3327.JPG